Con season is upon us again, although there’s never a bad time to cosplay. In December Bad Weather Burlesque had a FAN-tastic theme show, wherein I did a Saidi-inspired Harley Quinn number. I had just taken a Saidi workshop from Jasmin Jahal and I LOVED it! When you love two things they often have a lot of crossover. If you’d like to see the whole costume you can check out how I made it here.
The great thing about this method is that it is pretty easy to build, the materials are easy to find, and if you whack someone in the head they will only be mildly irritated rather than concussed. It’s also pretty light, so carrying it around won’t be taxing.
Want to make a mallet of your own? Here’s what you need:
- 1 wooden dowel, 3/4″ diameter (depending on the size of your hand), approx $2
- 1 roll bubble wrap, large bubbles, approx $16
- 1 roll red duct tape, $6
- 1 roll black duct tape, $6
- 2 sheets red duct tape, $2 each
- 2 sheets black duct tape, $2 each
- Hot glue and gun
- Scissors
- Saw (for cutting down the dowel)

My first concern was that for Saidi Raks al Assaya (dancing with a cane) my prop has to be light enough to swing it around and still control it. I also needed to make sure the head of the mallet did not whack me in the leg while I was spinning it. So I checked the clearance between my swing radius and my leg, both with length and diameter. The weight can shift so that the mallet turns sideways. If you are not dancing with this prop you may disregard this note and make it as big or small as you like.

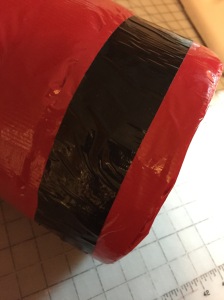
Apologies here, as I did not take a lot of pics during the process. At this point I secured the roll with a couple of pieces of red duct tape to keep everything in place while I did the ends. Learn from my mistakes here, as the ends will be very bumpy if you do not put something flat under your sheet of tape. Cut a circle from something that is at least the thickness of cardstock and put that underneath your sheet as you stick it to the end. If your mallet is larger than the sheet of duct tape you may need to use multiple pieces, or just use the tape from the roll. I do the ends first so that the edges of the duct sheet can be covered and secured by the tape. At this point wrap the red tape around and around and around the roll to cover the whole thing. Be careful to overlap so no bubble wrap can be seen.


At this point you should have what looks like a red cylinder. MAKE SURE YOU KNOW WHICH END IS UP, because we are going to affix our harlequin shapes to the ends. You want to make sure it looks good when you are posing with it so the harlequins shouldn’t be all kittywampus with respect to the handle, or each other. This is where duct sheets are extra handy. Draw out your pattern on the back side of the duct sheet, cut them out, and carefully stick them on. I actually just cut squares from the grid pattern and turned them sideways. If you want further embellishment wrap around a line of black duct tape near each end.
If you prefer, you can skip down to the handle part first and then come back to the decorations. Doesn’t really matter.

Now we are going to add our handle. If you are actually using this to dance Raks al Assaya, measure from the ground to about 2-3 inches below your navel if you keep your elbow in when swinging and cut the dowel to that length; or if you raise up your elbow then cut to whatever length is comfortable. Wrap the dowel in duct tape, alternating red and black. I made it striped by cutting a lot of small pieces and wrapping them around one at a time. If you want to try to wrap it at an angle, best of luck to you. That did not work for me with alternating colors. Important to note: if your hands get sweaty the duct tape can get slippery. Alternately you can wrap the handle in ribbon and just glue it down with craft glue. Make sure to cover the end too so it looks finished!

At this point that whole “which end is up” thing becomes important. Find the bottom center of your mallet head and mark it. Then get a pair of long scissors or a long thin knife and stab it a bunch of times to make a hole for the dowel to go in. Keep your movements straight up and down and be careful not to stab through the other side of the mallet head. Test the depth by sticking the dowel in the hole you’ve made. If it is too tall, keep stabbing. Or you might have to re-cut your dowel. This part requires some finessing. Once you are happy with the connection get out your hot glue gun, set to high, squeeze some glue into the stabby hole, then quickly stick the dowel into the hole. The high temp should cause the bubble wrap to melt a bit and you’ll have a really secure hold.
Give it a twirl, you’re done!
This is awesome! I didn’t even know duct tape came in sheets. I learned something new today; I have a feeling this will be important for me someday.