Tag: steampunk

Steampunk Softies – Craft Project and Book Review

Steampunk Softies
Steampunk Softies

Well, of course I had to pick up this book when I saw it in the store! Those craft retailers know the trends, and our weaknesses. Steampunk Softies is a new book by Sarah Skeate and Nicola Tedman. Many of you may be familiar with Sarah Skeate from her book Zombie Felties, which I also reviewed here. This book contains eight different characters/patterns, and includes very detailed instructions. The authors also include tips for how to modify some of the materials to make them look more authentic.
The first thing that you have to accept is that you will never, ever find the exact elements to perfectly recreate these dolls. And they tell you upfront in the introduction that you will have to make substitutions. This was actually a great exercise in creativity and making the doll your own. I was skeptical at first, but ultimately this was a lot of fun. I really had to look at craft items in a new way to achieve the look I wanted.
I chose to make Marveletta O’Houlihan. This decision was based mostly on the fact that she appeared to be the easiest doll to make. The materials and equipment list was very daunting, and to be honest I balked at it a bit. There are 37 individual items listed, including 4 different kinds of adhesive. Personally, I think E-6000 is the only adhesive I need, and it was the only thing I used. As a craft hoarder, I used this project as a personal challenge to purchase as little as possible and to just use what I had on hand. I’m sure you could easily spend $50 trying to assemble everything you needed. I say this because you can’t buy single bugle beads or 4 square inches of fabric at a time. So if you do one of these projects, try to work with what you’ve already got.

Constructing Marveletta

The body is assembled first, then the head piece is sewn on, and the collar covers the seam where they meet up. For the main body you are supposed to use a suiting fabric with a narrow pinstripe. The only appropriate fabric I had was brown, and I sewed pin stripes onto it, which they also recommend in the book if you can’t find what you need in the store. They are helpful with recommending substitutions here. For the hair they recommend a stretch woolen fabric. I did not have anything of that sort in my fabric collection, but I did have a fuzzy sweater with a hole in it that I planned to throw away. Lucky break there. I found working with the stretchy sweater really difficult, especially because the pattern has a lot of unusual curves that just didn’t keep their detail. But that’s just what I chose; another type of fabric may work better. I used muslin for the face and that worked out just fine. The face detail is drawn on with a marker, so I recommend that you do a test with the fabric and marker you choose before you do it for real on the final product. You have to hand-sew the stretchy hair fabric around the face in a kidney-shape with a blind stitch and that was probably the most difficult part of the whole project.
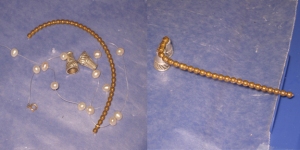
Opera Glasses
Opera Glasses

The next bit is the one that can either be really frustrating or really fantastic. Here you have to assemble her opera glasses and handbag. The body of the glasses is supposed to be a funnel-shaped metal blind pull weight, or similarly shaped bead. The handle is part of a handle to a tea strainer. Obviously I’m not going to go around town looking for a single blind pull weight, and if I hacksawed our tea strainer my husband would be a bit miffed because it is actually in active use at our house. Besides, those things are kind of expensive, at least too expensive to buy just so you can cut them apart. This is the point where I had to muster my creative energies and figure out how to make this work. My secret weapon: Sara Cura. Whenever I get to the Twin Cities area I stop by a little bellydance shop called Sara Cura, which is located in Dinkytown. The proprietor frequents estate sales for vintage jewelry and buys it in lots. These lots often contain broken and mismatched jewelry, which she sells in little bags for $4. Finally, this has paid off for me. I constructed the glasses from two funnel-shaped beads (purchased especially for this project), and two pearlescent beads from a broken necklace. For the handle I dug out an old bangle bracelet that I didn’t like, cut it and straightened it. I liked the texture of it and thought it would work here. All of this had to be glued together.
The handbag consists of beads and a charm I already had in my stash, and it is connected to the opera glasses with a chain from another broken necklace. The handbag is supposed to be attached to the body with a round-end safety pin, but I couldn’t find any. Instead I used a dangle earring finding. Her hair jewelry is an earring that had no mate.
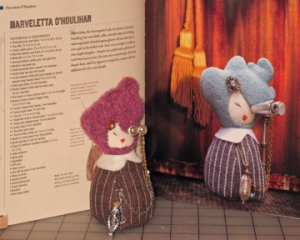
Marveletta - both versionsMarveletta – both versions
Marveletta close up
Marveletta close up

As far as my review of the book, the instructions were very detailed and there are lots of drawings and photos to help you figure it out. I think that the patterns could be very adaptable to different kinds of dolls for whatever occasion. This could be a lot of fun for  a craft hoarder, but if you have not amassed a ridiculous amount of oddball craft items over the years it could be particularly difficult or expensive to pull this together. Ultimately, the only things I purchased especially for the project were plastic pellets (for fill) and the funnel-shaped beads. With the massive supply list at the beginning I did go into this project thinking that there was no way it was practical. But it really forced me to use my brain, and that’s always a good thing. I genuinely feel inspired by the project and I look forward to doing another in my spare time.

Steampunk bag project

Costumed at CONvergence
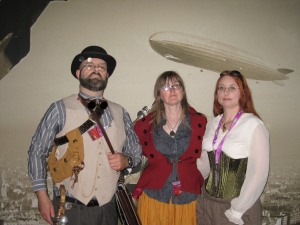
Eric, Karen and Erica

This is my very first blog post!

My latest spare-time project revolves around CONvergence. If you are unfamiliar with this annual affair, it is a huge genre convention held at the Bloomington, MN Sheraton Hotel. It regularly draws 3000-5000 people. Last year was my and Paul’s first year and we loved it! I went in costume so I am going to explain how this costume was put together for your edification.
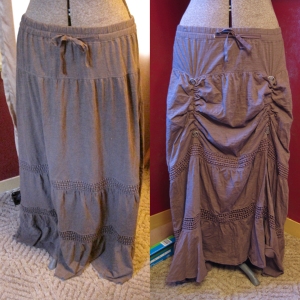
The easy part was the actual costume. I have fallen in love with the steampunk style so I worked with that idea this year (and last year as well!). The ensemble is composed of a cream-colored frilly blouse that I found at a thrift store, a pair of vintage goggles I found online (I think I paid $20), an altered skirt from Old Navy, boots from JC Penney, and the key piece was a lovely green corset that I bought at the CON. I had planned on that purchase this year because I just don’t have the knowledge or patience to sew a corset. Maybe I will someday, but today is not that day.

Skirt from Old Navy
From Boring to Steam

It took very little time to alter the skirt. I just gathered it in strategic places and added vintage-looking buttons from JoAnn Fabrics. My main accessory to this whole thing was a rather snappy-looking messenger bag. I found this bag in Mills Fleet Farm’s army surplus section for $15. When I showed my husband he decided he should get one because it is perfect for carrying the Netbook. I also showed it to my friends Karen and Eric, who each ended up buying one, and I just found out my dad bought one after I showed him mine on Father’s Day. It’s just too good a deal. So I went to work turning it into a steampunk-style bag. I called on a very knowledgeable friend for advice on leatherwork. He was able to hook me up with what I needed.

Before and after
Finished bag and original

I got a 8 1/2 x 11 inch piece of leather, mahogany dye, sealant, screws for leather, and a really cool dragonfly adornment that is also for leather specifically. My first step was to make a stencil from brushes I downloaded from obsidiandawn.com. She has some gear brushes for Photoshop that worked perfectly. I printed off a design and cut it out of the leather with a box cutter. I then burned the edges with a soldering iron to give it a more finished look. It worked OK . I would have liked it darker, but I was under some time constraints, as usual. I then stained the leather. It ended up being streaky, so I had to stain it twice. Since I was using a water-based stain it took 24 hours for each pass to dry, leaving me with even less time. After I finally got the sealant on it looked somewhat distressed and very dark, but I think it worked pretty well. Next I glued some pewter-colored fabric (half-price remnant) to the back side of the leather piece so it would show through as gears. I used the screws to hold the cut-out pieces to the bag. That got to be hard, because the hole puncher only reaches about 1 1/2 inches. Paul ended up helping me drill holes through the bag. Then the screw for the dragonfly decoration was shorter than the other screws and I couldn’t get it to go through all of the layers. I ended up having to hot glue one corner of the main piece to the bag and also the gear decoration that covers the clasp on the bottom. I would have used E-6000, but I had reached my last night and I didn’t have time for the adhesive to set. My final detail was to hang a chain between the dragonfly and the screw in the top gear. I was pretty happy with how it had turned out.

It turns out I should have started earlier and used the E-6000. The one corner came loose and my gear ripped off almost immediately. I managed to locate some crazy glue, but ultimately that would not save my gear. It is probably somewhere in the dealers’ room. The jump rings I used to connect the chain to the screws kept pulling apart and I eventually had to just pull it off entirely. Ultimately, for a woman this turned out to be a very bad bag. It was difficult to access and didn’t work for girly things like a makeup kit and hairbrush. If I were transporting documents it would have worked just fine. The part that made this realization difficult was that I was getting compliments on the bag, so it still looked great in spite of everything – it just isn’t functional.

I am already plotting a more lady-friendly bag for next-year. And a more elaborate costume. But I’ll have to do that in my spare time.